Installing a Stainless Steel Exterior Wall starts with precise measurements, choosing the right panels, and preparing your wall surface. Proper planning ensures the panels fit perfectly and stay secure, while high-quality materials like 304 or 316 stainless steel resist corrosion and maintain a modern look over time.
1. Planning and Preparation
Before starting the installation of a Stainless Steel Exterior Wall, careful planning and preparation are crucial. Proper preparation not only saves time during construction but also ensures the final result is stable, durable, and visually appealing.
1.1 Measuring the Wall Area
Accurately measuring the wall area is the very first step:
-
Use a tape measure to record the total height and width of the wall, repeating measurements to ensure accuracy.
-
Mark any obstacles such as windows, vents, or air conditioning units. These areas will need special panel adjustments or cuts.
-
Check for uneven or sloping surfaces, as these can affect how the સ્ટેનલેસ સ્ટીલ પેનલ્સ will be mounted.
For example, in a modern residential project in Los Angeles, the construction team discovered a slight slope on the original wall. By adjusting the support frame during the planning phase, they achieved a perfectly aligned stainless steel wall that enhanced the home’s sleek appearance.
1.2 Choosing the Right Stainless Steel Panels
Selecting the correct સ્ટેનલેસ સ્ટીલ પેનલ્સ is key to ensuring longevity and visual quality. Consider the following:
-
Material Grade: 304 or 316 stainless steel. 316 is recommended for coastal or humid environments due to higher corrosion resistance.
-
Surface Finish: Brushed, mirror, or sandblasted—each finish affects light reflection and aesthetic appeal.
-
Thickness: Panels usually range from 1.0–2.0 mm. Thicker panels offer more durability but require stronger support.
| પરિબળ | Recommendation | નોંધો |
|---|---|---|
| Material Grade | 304 / 316 | Use 316 in high-corrosion areas |
| Surface Finish | Brushed / Mirror / Sandblasted | Affects appearance and maintenance |
| Thickness | 1.0–2.0 mm | Heavier panels need reinforced support |
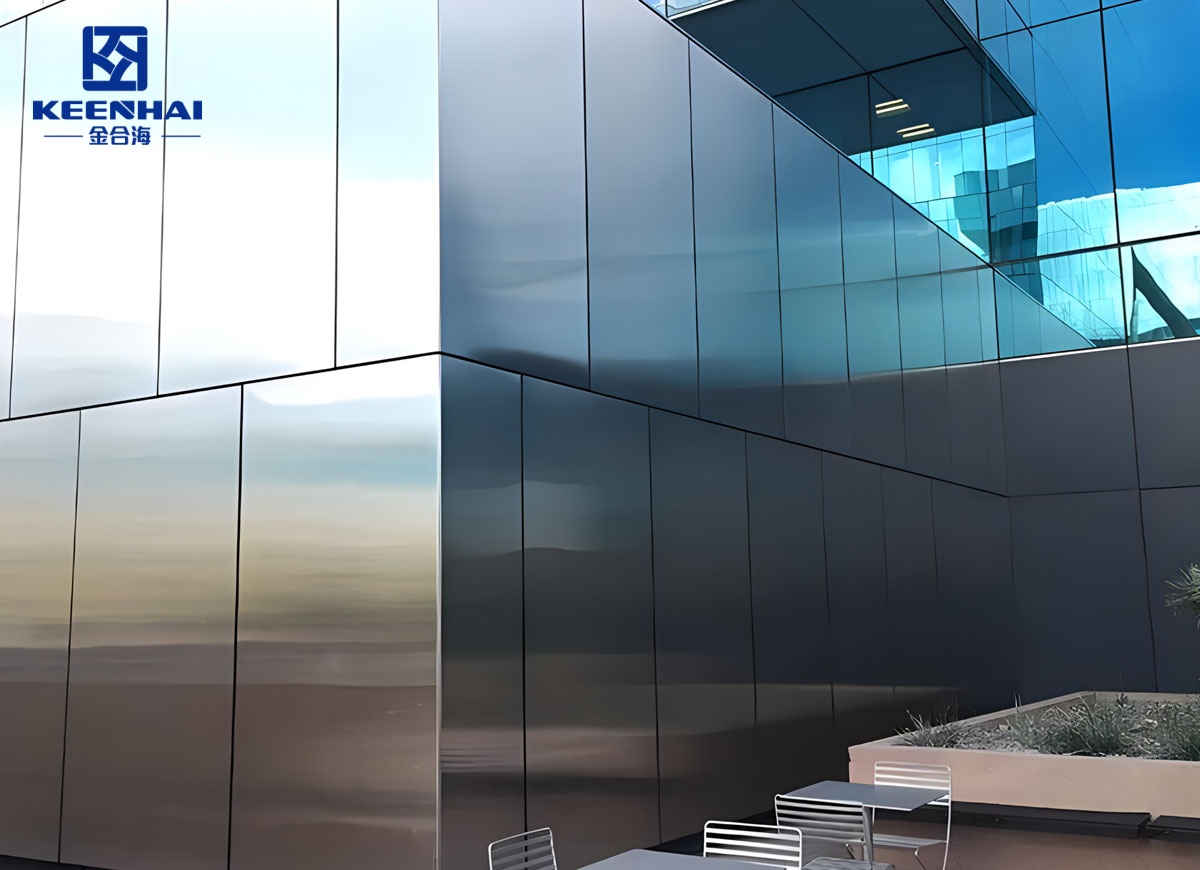
In a high-rise office building in New York, the team chose 316 brushed panels to ensure both durability and a modern look, perfectly matching the architectural design.
1.3 Gathering Tools and Materials
Having all tools and materials ready before starting work is essential:
-
Electric drill, hammer drill, and impact screwdriver for attaching panels and supports.
-
Level, tape measure, and marking tools for precise placement.
-
Stainless steel screws, brackets, angles, and waterproof sealing strips.
-
Personal protective equipment, including gloves, safety glasses, and helmets.
For instance, during a villa renovation in Shanghai, the team prepared multiple tool sets in advance, allowing them to switch between floors without delays, saving at least two full days of work.
1.4 Preparing the Surface for Installation
Proper wall preparation directly impacts panel fitting:
-
Clean the wall surface from dust, debris, or old coatings to ensure a dry, smooth base.
-
Level any cracks or uneven areas with cement or filler to create a flat surface.
-
Before mounting the support frame, use a level to check alignment and make adjustments.
At a modern apartment project in London, the walls had slight irregularities. By using adjustable aluminum supports, the stainless steel panels were installed perfectly flat, maintaining a clean and polished exterior despite the original uneven surface.
These steps ensure that the Stainless Steel Exterior Wall installation proceeds smoothly, with panels aligned and durable, while natural internal links are incorporated, such as સ્ટેનલેસ સ્ટીલ પેનલ્સ and your brand’s website.
2. Installing the Frame and Supports
Once the wall area is measured and all materials are ready, the next crucial step is installing the frame and supports. This step forms the backbone of your Stainless Steel Exterior Wall, ensuring the panels stay secure and aligned over time.
2.1 Marking Panel Placement
Before attaching any supports, carefully mark where each panel and support bracket will go:
-
Use a chalk line or laser level to draw horizontal and vertical lines where panels will align.
-
Measure spacing between panels according to the manufacturer’s guidelines, usually leaving 2–3 mm gaps for expansion.
-
Double-check measurements at multiple points along the wall to avoid cumulative errors, which can throw off panel alignment.
In a Miami coastal apartment project, marking the panel placement precisely allowed the installation team to adjust for minor wall curvature, preventing visible gaps after mounting the stainless steel panels.
2.2 Installing Wall Anchors and Supports
Wall anchors and metal supports provide the structural framework for your panels:
-
Drill holes into the wall according to your marked points, making sure the drill bit matches the anchor size.
-
Insert stainless steel or heavy-duty anchors to handle the weight of the panels, especially if using thicker Metal Stainless Steel Sheets.
-
Secure vertical and horizontal brackets using screws or bolts, checking each connection for stability.
-
Use a level to confirm that all supports are perfectly vertical and horizontal before proceeding.
For example, in a commercial building in Chicago, installing extra horizontal brackets every 60 cm helped support the heavy brushed stainless steel panels, ensuring they would not warp over time.
2.3 Ensuring Level and Alignment
Maintaining precise level and alignment at this stage is critical:
-
Frequently check verticality with a spirit level, especially at corners and near edges.
-
Adjust brackets slightly if needed; even a few millimeters off can make the panel look crooked once mounted.
-
For large-scale walls, it’s helpful to have one team member focus solely on alignment while others attach panels.
In a recent project in Los Angeles, the team installed a modern stainless steel metal cladding facade on a high-rise office. By consistently checking level and alignment during frame installation, they avoided a situation where panels would later need costly adjustments.
2.4 Preparing for Panel Mounting
Once the frame is in place:
-
Clean the brackets and support surfaces to remove dust or debris.
-
Ensure all screws and bolts are tight but not over-torqued to allow minor adjustments.
-
Mark reference lines on the supports to guide panel attachment, which helps maintain even spacing and flush surfaces.
These steps guarantee that when the સ્ટેનલેસ સ્ટીલ મેટલ ક્લેડીંગ રવેશ or panels are mounted, they sit perfectly flat and stable, creating a professional, polished appearance. Proper framing also reduces stress on the panels during thermal expansion and contraction, improving longevity.
3. Mounting Stainless Steel Panels
After the frame and supports are properly installed, it’s time to mount the Stainless Steel Exterior Wall panels. This is where the wall begins to take its final shape, so precision and care are key.
3.1 Attaching Panels to the Frame
Mounting panels involves several careful steps:
-
Start from one corner of the wall to ensure proper alignment across the entire surface.
-
Lift the first panel and place it against the support brackets, making sure the edges match the marked reference lines.
-
Use stainless steel screws or rivets to secure the panel, starting at the top and working downward, which helps avoid scratches or misalignment.
In a modern hotel project in Dubai, installers began from the bottom-left corner and worked row by row. By following this systematic approach, they achieved a perfectly flush surface with no visible gaps, despite minor wall irregularities.
3.2 Securing Panels with Screws or Rivets
The choice of fasteners depends on panel type and environmental conditions:
-
Stainless steel screws are ideal for most urban installations due to corrosion resistance.
-
Rivets may be used when a smoother, less intrusive finish is desired.
-
Ensure each screw or rivet is tightened enough to hold the panel firmly but not so tight that it deforms the panel.
| પેનલ પ્રકાર | Recommended Fastener | નોંધો |
|---|---|---|
| Brushed Stainless Steel | #10 Stainless Steel Screws | Standard for residential/commercial |
| મેટલ સ્ટેનલેસ સ્ટીલ શીટ | Stainless Steel Rivets | Provides flush finish, reduces visible heads |
| Thick Panels (>2mm) | Heavy-Duty Screws + Brackets | Extra support for weight |
3.3 Maintaining Consistent Panel Spacing
Consistency in spacing between panels is crucial to accommodate expansion, contraction, and aesthetic balance:
-
Keep 2–3 mm gaps between panels using spacers or measuring tools.
-
Regularly check spacing along both horizontal and vertical axes to maintain uniformity.
-
For larger walls, periodically step back and visually inspect the alignment to catch errors early.
In a commercial building in Seattle, installers mounted સ્ટેનલેસ સ્ટીલ મેટલ પ્લેટ panels across a 20-meter facade. By carefully spacing each panel and frequently checking with a long level, they avoided misalignment and minimized visible seams.
3.4 Handling Adjustments and Corrections
Even with meticulous planning, minor adjustments are often necessary:
-
If a panel is slightly off, loosen screws slightly, adjust its position, and retighten.
-
Use a rubber mallet to gently tap panels into alignment without scratching the surface.
-
Keep extra fasteners and touch-up materials nearby in case of small corrections.
Proper mounting ensures not only the aesthetic appeal of your Stainless Steel Exterior Wall but also its structural stability. Correct installation reduces future maintenance and guarantees that panels remain flush and secure for years.
4. Finishing Touches
After mounting all panels, the finishing touches determine both the visual appeal and durability of your Stainless Steel Exterior Wall. Proper attention at this stage ensures the wall looks professional and maintains its performance over time.
4.1 Sealing Joints and Edges
Sealing prevents water infiltration and protects against corrosion:
-
Apply a high-quality silicone or polyurethane sealant along all vertical and horizontal panel joints.
-
Use a caulking gun to ensure an even, continuous bead without gaps.
-
Smooth the sealant with a flexible spatula or your finger (wear gloves), making sure it sits flush with the panel surface.
-
For edges near corners or fixtures, double-check that the sealant fully covers potential water entry points.
In a waterfront property in Miami, sealing all joints was critical. The construction team applied 316-grade stainless steel panels and sealed them meticulously. This prevented water from entering during heavy rainstorms and kept the panels free from stains over time.
4.2 Inspecting for Gaps or Misalignment
Even after careful mounting, minor adjustments may be needed:
-
Step back and visually inspect the wall from multiple angles, looking for uneven panels or inconsistent gaps.
-
Use a level or straightedge to check alignment along horizontal and vertical lines.
-
If a panel is slightly misaligned, loosen the mounting screws slightly, adjust the panel, and retighten carefully.
-
Ensure spacing between panels remains consistent to allow thermal expansion, usually 2–3 mm.
At a modern office project in Chicago, the team noticed a slight misalignment caused by wall irregularities. They used adjustable brackets to realign the panels, maintaining both the structural integrity and aesthetic of the stainless steel facade.
4.3 Polishing and Surface Cleaning
Proper cleaning and finishing enhance the appearance and longevity of your stainless steel wall:
-
Start with a soft cloth or sponge and warm, soapy water to remove dust, dirt, and fingerprints.
-
For brushed or mirror finishes, use a stainless steel polish or cleaner to bring out shine and protect the surface.
-
Wipe in the direction of the grain to avoid streaks, and always use a microfiber cloth to prevent scratches.
-
If your installation involves સ્ટેનલેસ સ્ટીલ મેટલ ક્લેડીંગ રવેશ, pay extra attention to corners and seams where residue may accumulate.
In a high-rise residential project in Los Angeles, the construction team polished the panels after installation, giving the exterior a sleek, reflective surface. This finishing step not only enhanced the aesthetic appeal but also reduced dust buildup on the wall.
4.4 Optional Accessories and Adjustments
-
Install trim pieces or corner covers to conceal exposed edges and improve visual continuity.
-
Add protective strips at ground level if panels extend close to sidewalks or landscaping.
-
Inspect the wall after initial exposure to weather for any minor adjustments or touch-ups needed.
These finishing touches ensure the Stainless Steel Exterior Wall maintains its professional look and performs reliably over time. Careful sealing, alignment checks, and polishing create a durable, visually appealing exterior that stands out in any architectural project.