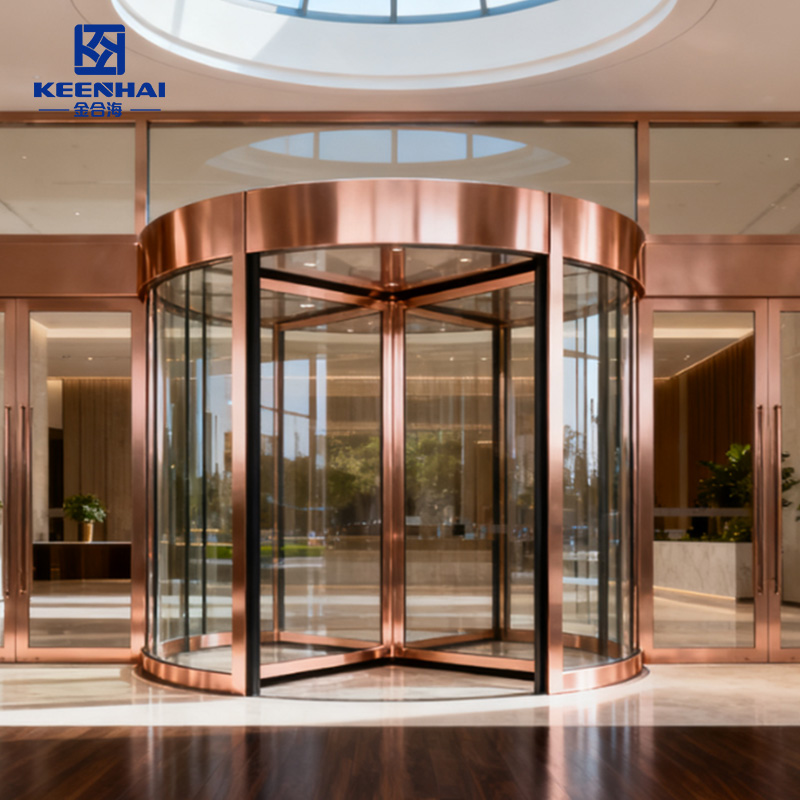
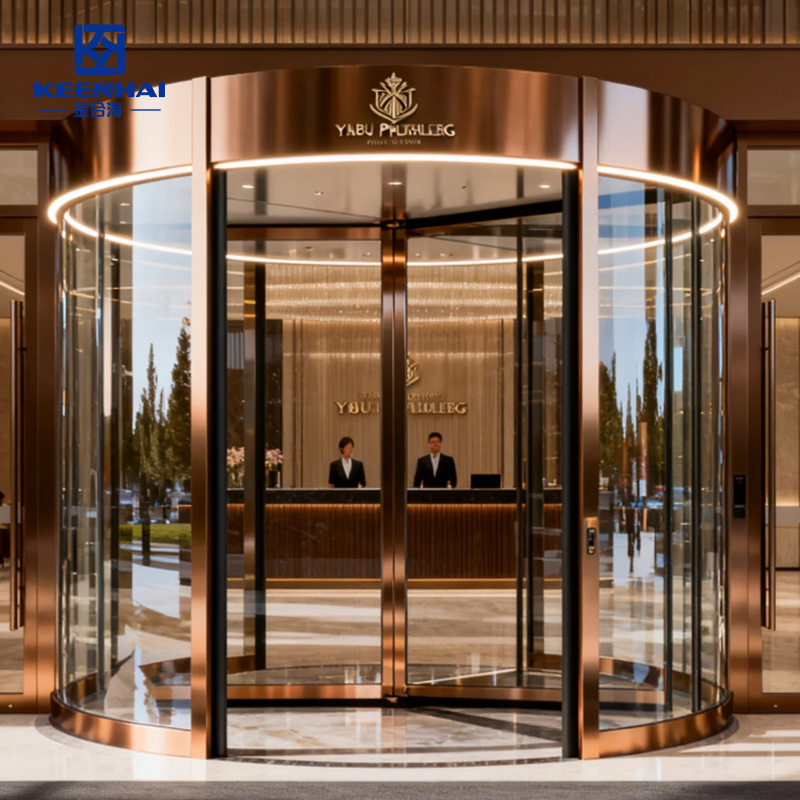
Proper preparation is essential before installing a stainless steel glass revolving door. Measure doorway dimensions accurately, check floor load capacity, and gather all necessary tools. These steps prevent installation errors, ensure smooth rotation, and avoid long-term maintenance issues. Planning early can save time and costs while ensuring your door operates efficiently in high-traffic areas like hotels and shopping malls.
1. Preparation and Site Assessment
Proper Stainless Steel Glass Revolving Door installation starts with thorough site assessment and preparation. Accurately measuring the doorway ensures the door fits perfectly without gaps or structural stress. Begin by checking both width and height, factoring in ceiling clearances, floor thresholds, and surrounding architectural features. This step is essential for smooth rotation and long-term durability.
1.1 Measuring Doorway Dimensions and Clearances
Measure the doorway width, height, and depth at multiple points to account for any uneven surfaces. Record the maximum and minimum values to identify tolerances. Ensure at least 150–200 mm clearance above the door for motorized units and ceiling-mounted hardware. For high-traffic locations like malls or hotel lobbies, consider additional clearance for pedestrian safety.
1.2 Checking Floor Level and Load Capacity
The floor must be level and capable of supporting the total weight of the revolving door, which may range from 400 kg to 1200 kg depending on size and material. Verify concrete strength and use a laser level to identify slopes greater than 2 mm per meter, which can impair rotation. The table below compares typical door sizes and floor load requirements:
| తలుపు రకం | Width × Height (mm) | Approx. Weight (kg) | Minimum Floor Load (kPa) | Recommended Clearance (mm) |
|---|---|---|---|---|
| Hotel Stainless Steel Revolving Door | 3000 × 2400 | 650 | 250 | 180 |
| షాపింగ్ మాల్ స్టెయిన్లెస్ స్టీల్ రివాల్వింగ్ డోర్ | 3600 × 2500 | 900 | 300 | 200 |
| గోల్డ్ PVD స్టెయిన్లెస్ స్టీల్ రివాల్వింగ్ డోర్ | 3200 × 2400 | 750 | 270 | 180 |
1.3 Gathering Tools, Equipment, and Materials
Collect essential tools such as laser levels, torque wrenches, power drills, and lifting equipment. Materials should include anchors, gaskets, lubricants, and sealants suitable for stainless steel and tempered glass. For motorized systems, confirm availability of electrical wiring and compatible power sources. Having all components on-site prevents delays and ensures installation follows manufacturer specifications.
1.4 Site Environment Assessment
Evaluate surrounding environmental conditions. Avoid areas with excessive moisture, direct sunlight on glass panels, or frequent exposure to corrosive substances. For example, hotel lobbies often have high humidity, so choose corrosion-resistant finishes. Shopping centers may require reinforced floor mounts due to heavy pedestrian flow. Ensuring the environment supports the Modern Stainless Steel Glass Revolving Door guarantees performance and longevity.
1.5 Safety and Access Planning
Plan clear access routes for equipment, materials, and installation personnel. Designate temporary barriers to keep pedestrians away during installation. Use scaffolding or lifting rigs only when necessary, and always verify floor load distribution to prevent tipping hazards. Proper planning reduces installation errors and speeds up the workflow.
This approach ensures that the Stainless Steel Glass Door System fits precisely, operates smoothly, and maintains durability over time, especially in high-traffic commercial environments.
2. Frame and Foundation Installation
Installing the main frame of a stainless steel glass revolving door requires precision and careful preparation to ensure smooth operation and long-term stability. Start by confirming the site measurements and floor readiness. The frame must be positioned accurately to prevent rotation issues and structural stress.
2.1 Positioning the Main Frame
- Lay out the frame components and identify the front, back, and side sections.
- Position the frame so that it aligns perfectly with the centerline of the doorway, keeping a tolerance of ±2 mm.
- For Hotel Stainless Steel Revolving Door installations, ensure there is at least 200 mm of clearance on either side for maintenance access and emergency egress.
- Temporarily secure the frame using clamps and verify that the vertical posts are plumb and the horizontal rails are level using a laser level.
2.2 Securing Anchors and Leveling the Frame
- Drill anchor holes according to the manufacturer’s specifications, typically 12–16 mm in diameter, depending on door size and floor material.
- Insert stainless steel expansion bolts and tighten to a torque of 50–70 Nm for standard commercial installations.
- Adjust leveling shims under each base plate until the frame sits perfectly horizontal.
- Recheck all diagonals to ensure the frame is square, as any misalignment can cause rotation issues or uneven wear over time.
2.3 Verifying Structural Alignment
- After securing the frame, measure diagonals from corner to corner; differences should be no more than 3 mm.
- Verify that the central shaft axis is aligned with the floor center to prevent wobbling during operation.
- Inspect the frame for any gaps between posts and floor, and fill voids with non-shrink grout where necessary.
- Ensure all connections are tightened and that the frame supports the weight of glass panels without deflection.
Following these steps guarantees that the main structure of the revolving door is stable and ready for wing and shaft assembly. Accurate alignment at this stage prevents operational problems and reduces long-term maintenance.
3. Central Shaft and Wing Assembly
The central shaft is the heart of any Stainless Steel Glass Revolving Door, supporting the wings and allowing smooth rotation. Proper installation ensures safety, stability, and long-term performance.
3.1 Installing the Rotating Central Shaft
- Lift the pre-assembled central shaft into position, aligning it with the frame center.
- Secure the shaft with the base bearings and top support brackets, ensuring vertical alignment within ±1 mm.
- Check that the shaft rotates freely without lateral play before proceeding to wing installation.
- For larger doors, like షాపింగ్ మాల్ స్టెయిన్లెస్ స్టీల్ రివాల్వింగ్ డోర్, use lifting equipment to safely position the shaft due to higher weight, often exceeding 250 kg.
3.2 Attaching Stainless Steel Wings and Glass Panels
- Attach the wings to the central hub sequentially, starting from the main entry wing.
- Secure glass panels to wing frames using pre-installed gaskets and stainless steel fasteners, ensuring even pressure distribution to prevent cracks.
- Verify that all wings are oriented at the correct angle (commonly 90° for four-wing doors) for smooth rotation and even spacing.
- Use protective gloves and padding to prevent scratches on polished stainless steel and tempered glass.
3.3 Adjusting Wing Alignment for Smooth Rotation
- Rotate the wings manually to detect any rubbing or uneven movement.
- Adjust the top and bottom shaft collars in small increments until rotation is smooth.
- Check gaps between wings and frame; maintain a 5–10 mm clearance to allow thermal expansion.
- Tighten all fasteners once alignment is confirmed, and verify that the door returns to a neutral stop position without resistance.
Proper central shaft and wing assembly ensures the Premium Revolving Door in Stainless Steel and Glass operates efficiently under high traffic conditions, reducing maintenance needs and providing a smooth, elegant entrance experience.
4. Electrical and Automation Setup
Automating a Stainless Steel Glass Revolving Door enhances efficiency and user experience, especially in high-traffic areas like hotel lobbies or shopping centers. Proper installation of the motor, drive system, and sensors is critical to ensure smooth operation and safety.
4.1 Installing Motor and Drive System
- Mount the motor according to manufacturer specifications, ensuring secure attachment to the top frame.
- Connect the drive belt or gear assembly to the central shaft, checking for proper tension to prevent slippage.
- Confirm that the motor orientation aligns with the intended rotation direction.
- For large doors such as Hotel Stainless Steel Revolving Door, select a motor capable of handling up to 1,000 kg of rotating mass to maintain consistent speed under heavy traffic.
4.2 Wiring Sensors and Control Panels
- Install presence sensors at each door segment to detect pedestrians and prevent collisions.
- Wire the control panel to the motor and sensors, following electrical schematics precisely.
- Ensure all connections are insulated and routed to prevent interference or accidental contact with moving parts.
- Test sensor response by simulating traffic and verifying automatic door stop and start functions.
4.3 Testing Automatic Speed and Safety Functions
- Power up the system and set the rotation speed according to building codes, usually 6–12 rpm for commercial settings.
- Test emergency stop functions and confirm the door halts immediately when sensors detect obstruction.
- Observe rotation for smoothness, listening for unusual noises that indicate misalignment or excessive friction.
- Adjust motor torque and sensor sensitivity as needed to achieve seamless operation and reliable safety performance.
This setup ensures the Modern Stainless Steel Glass Revolving Door operates efficiently, safely, and reliably, providing a premium user experience while reducing long-term maintenance requirements.

5. Sealing, Weatherproofing, and Finishing Touches
Proper sealing and finishing are crucial for maintaining the longevity and appearance of a Stainless Steel Glass Revolving Door. High-quality seals prevent air drafts, water ingress, and reduce energy loss, while polished surfaces enhance the aesthetic appeal.
5.1 Installing Gaskets, Floor Brushes, and Roof Seals
- Place perimeter gaskets around the frame to seal gaps between wings and doorway.
- Attach floor brushes under each wing to prevent debris entry and minimize friction during rotation.
- Install roof seals on top of the door frame to protect against water leakage and dust accumulation.
- Check that all seals are compressed evenly, ensuring a snug fit without restricting wing movement.
5.2 Checking for Water Ingress and Air Leaks
- Conduct a water test by spraying along frame edges and roof seals, observing for leaks.
- Use a smoke pencil or infrared detector to identify air gaps that could compromise energy efficiency.
- Adjust gaskets or add silicone sealant to areas where minor leaks occur.
- Verify that the door maintains smooth rotation after all adjustments.
5.3 Polishing Stainless Steel and Glass Surfaces
- Clean stainless steel frames with a non-abrasive polish to remove fingerprints and oxidation marks.
- Wipe tempered glass panels with a streak-free cleaner, avoiding harsh chemicals that may damage seals.
- Regularly maintain surfaces to preserve the door’s high-end appearance, especially in commercial spaces like షాపింగ్ మాల్ స్టెయిన్లెస్ స్టీల్ రివాల్వింగ్ డోర్ entrances.
- Inspect all moving components after polishing to ensure nothing was loosened during cleaning.
These finishing steps ensure the Premium Revolving Door in Stainless Steel and Glass delivers optimal performance, enhances building aesthetics, and provides reliable protection against environmental factors.